Preparation
Confirm that the HDD to be installed is compatible with the server model. You can check the compatibility using the Arcfra Hardware Compatibility Checker. In addition, ensure that the capacity of the new HDD is not smaller than that of the original one.
Identify and record the serial number of the physical node where the HDD is located, the rack location, and the slot of the disk to be replaced. You can refer to Locating a physical disk to locate the physical disk on the host by flashing its locator light.
Log in to AOC and unmount this HDD.
Procedure
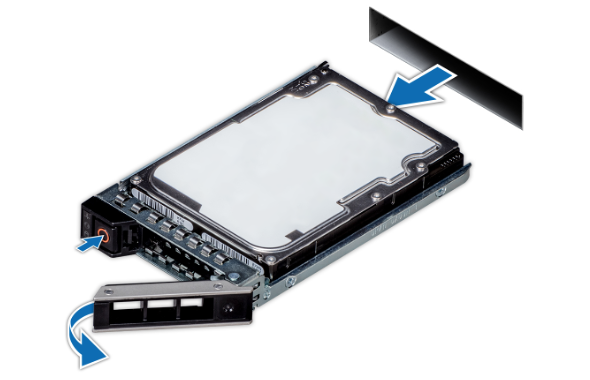
Remove the HDD from the host as shown in the figure below.
Log in to AOC. An alert appears indicating that the system has detected a physical disk removed from the host. If the host is a multi-node high-density server or a blade server, the alert will also display the location of the physical disk slot within the chassis.
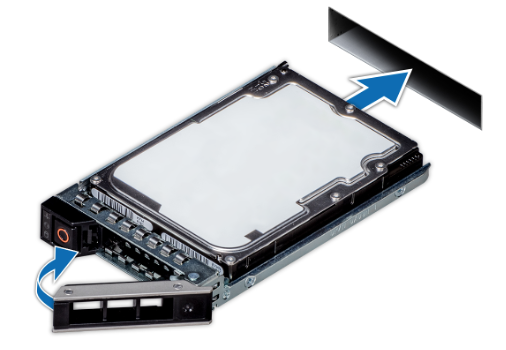
Install a new HDD on the physical server as shown in the figure below.
Log in to AOC. An alert appears indicating that the system has detected a new physical disk inserted into the host. If the host is a multi-node high-density server or a blade server, the alert will also display the location of the physical disk slot within the chassis.
Use SSH to log in to the host where the HDD is installed, and run the lsblk command to view the newly installed HDD. At this point, the disk has not been partitioned, as shown in the following example, where sdf represents the installed HDD.
NAME MAJ:MIN RM SIZE RO TYPE MOUNTPOINT
sda 8:0 0 59.6G 0 disk
└─sda1 8:1 0 200M 0 part /boot
sdb 8:16 0 372.6G 0 disk
├─sdb1 8:17 0 45G 0 part
│ └─md127 9:127 0 45G 0 raid1 /
├─sdb2 8:18 0 20G 0 part
│ └─md0 9:0 0 20G 0 raid1 /var/lib/zbs/metad
├─sdb3 8:19 0 10G 0 part
└─sdb4 8:20 0 287.6G 0 part
sdc 8:32 0 372.6G 0 disk
├─sdc1 8:33 0 45G 0 part
│ └─md127 9:127 0 45G 0 raid1 /
├─sdc2 8:34 0 20G 0 part
│ └─md0 9:0 0 20G 0 raid1 /var/lib/zbs/metad
├─sdc3 8:35 0 10G 0 part
└─sdc4 8:36 0 287.6G 0 part
sdd 8:48 0 931.5G 0 disk
└─sdd1 8:49 0 931.5G 0 part
sde 8:64 0 931.5G 0 disk
└─sde1 8:65 0 931.5G 0 part
sdf 8:80 0 931.5G 0 disk
sdg 8:96 0 931.5G 0 disk
└─sdg1 8:97 0 931.5G 0 part
sr0 11:0 1 1.4G 0 romLog in to AOC and mount the new physical disk.
After the HDD is successfully mounted, you can check its mounting status in the physical disk list of the host. If the HDD is marked as Mounted, the replacement is complete.
If the HDD fails to be mounted via AOC, run the following command on the node where the HDD resides to remount the HDD, where sdf represents the HDD to be mounted.
```
zbs-deploy-manage mount-disk /dev/sdf data
```If the output is displayed as follows, the physical disk is successfully mounted.
```
2017-06-14 10:42:31,382 INFO mount_extent_disk: Start mount extent disk: /dev/sdf
2017-06-14 10:42:31,562 INFO run: waiting zbs-chunkd start .....
......
2017-06-14 10:42:33,141 INFO run: Number Start End Size File system Name Flags
2017-06-14 10:42:33,141 INFO run: 1 0.02MiB 953870MiB 953870MiB 1
2017-06-14 10:42:33,141 INFO run:
2017-06-14 10:42:33,141 INFO run: Format disk using zbs-chunk partition:/dev/sdf1
2017-06-14 10:42:33,542 INFO run: Format succeed
2017-06-14 10:42:33,542 INFO run: Mount disk using zbs-chunk
2017-06-14 10:42:34,074 INFO run: Mount succeed
d2017-06-14 10:42:35,175 INFO mount_extent_disk: Mount extent disk: /dev/sdf success!
```