Precaution
When adding hosts to the cluster to be expanded, you only need to perform the following operations on the nodes to be added. Cluster-level settings will be automatically retrieved from the cluster and do not need to be configured again.
Procedure
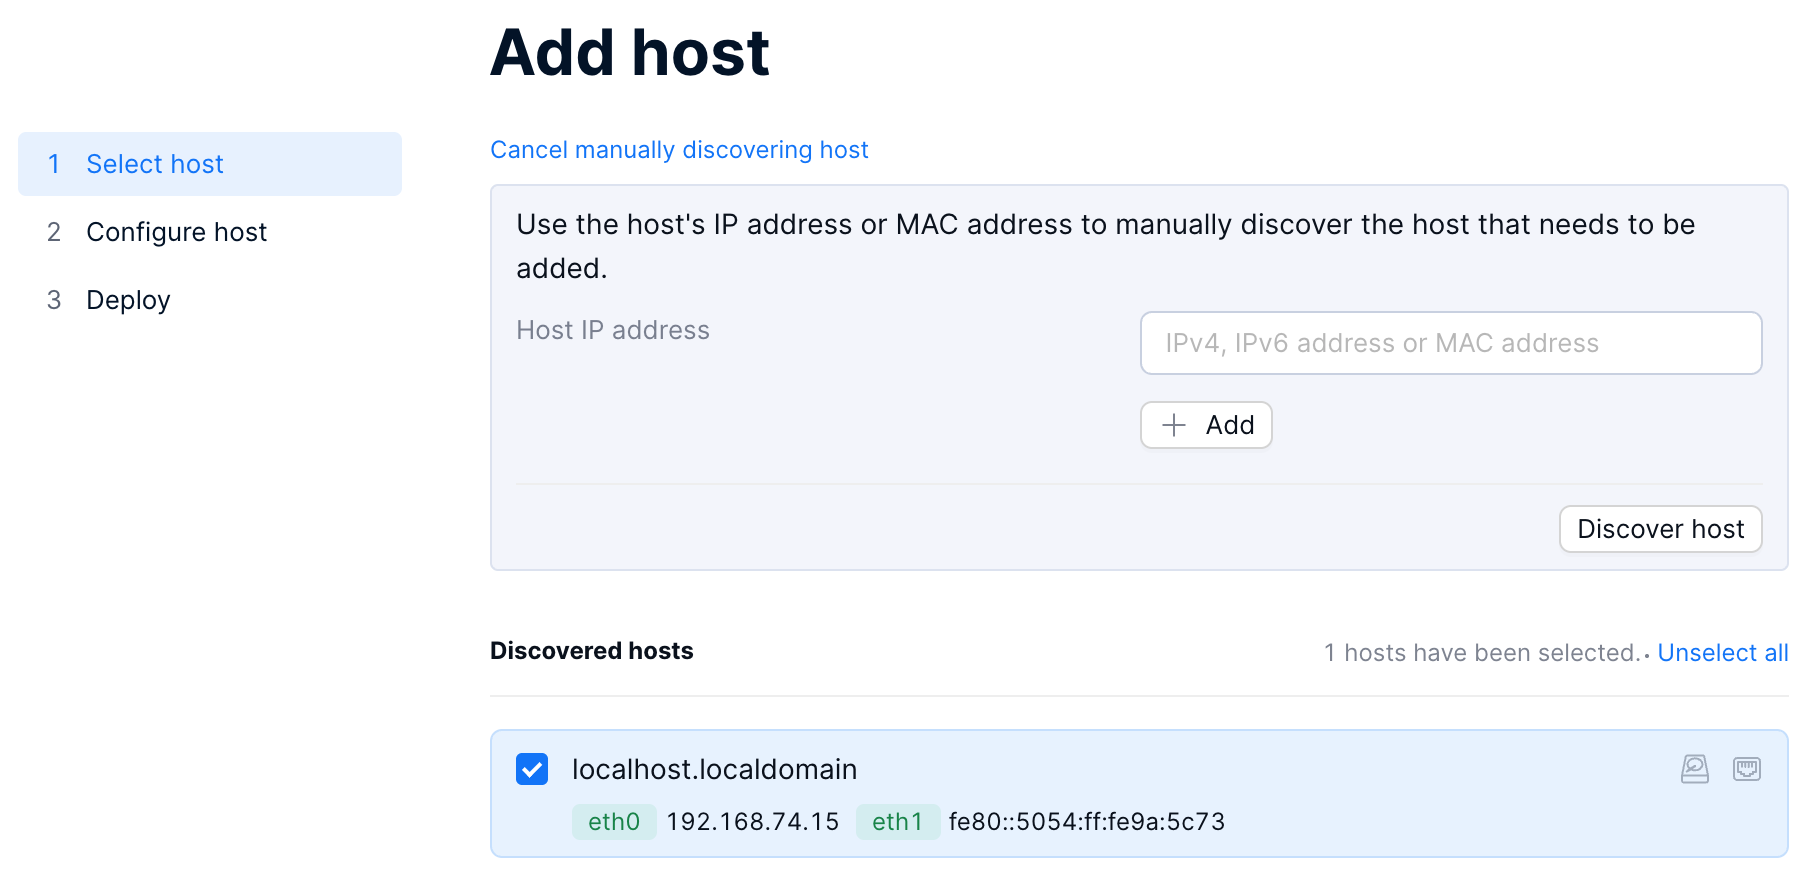
Log in to AOC and select the cluster to be expanded from the left sidebar to access its Overview page. On the upper-right corner, select + Create > Add host, and open the Add host dialog box. You can manually discover hosts or use automatic scanning to find them.
Manually discovering hosts
Enter the IP or MAC address of the hosts to be added in the Host IP address input box, click Add to add multiple host addresses, and click the Discover host button to discover hosts.

Automatically scanning hosts
You can also click auto scan to discover hosts. After the scan is complete, if there are any hosts in the current network that have not been added, their host names, IP addresses, or MAC addresses will be displayed on the page. When you hover over the icon on the right, information about the corresponding physical disk and network port will be displayed.
If no hosts to be added are found on the current network after the scan, the system will advise you to Rescan or Discover manually.
Select the host to be added, and click Next.
On the Configure host page, enter the host names of the nodes to be added.
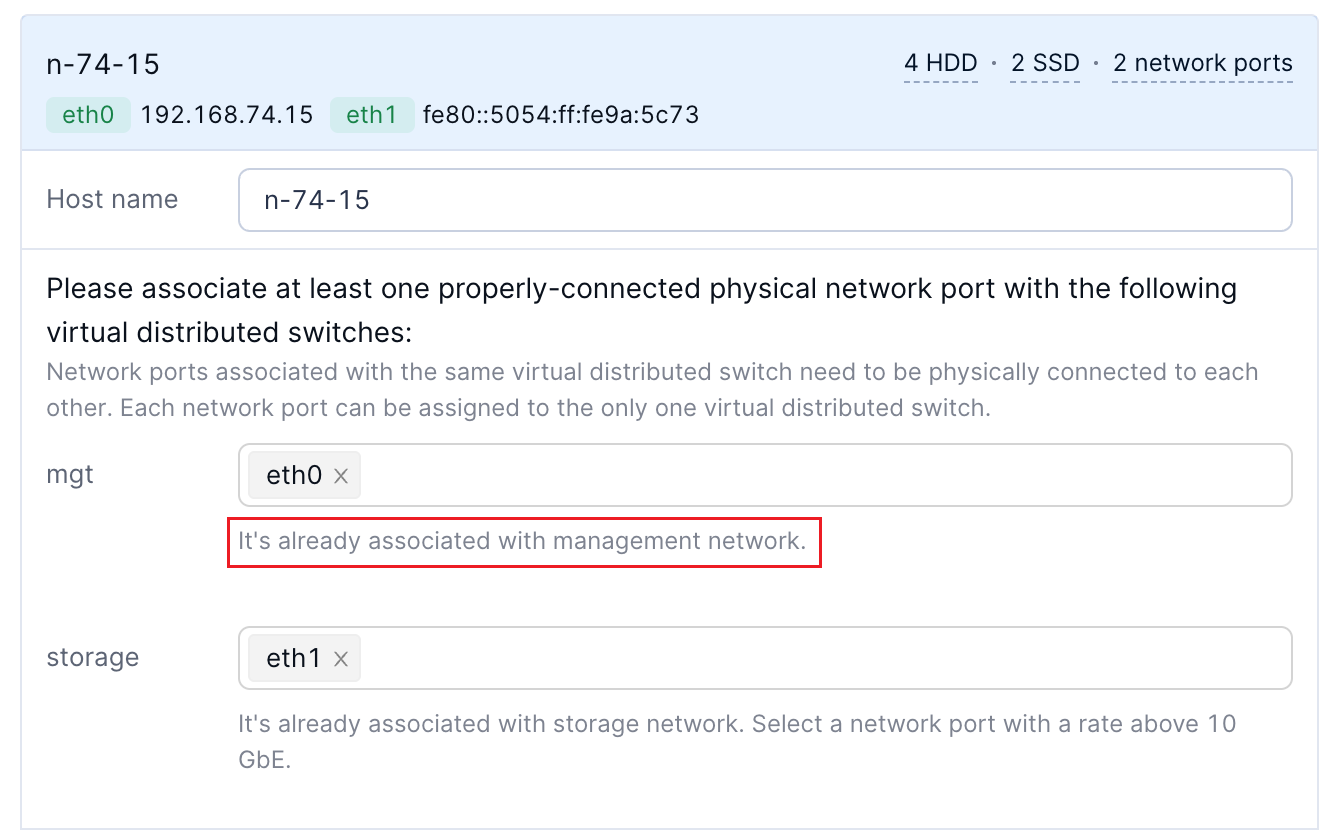
Associate a physical network port with the virtual distributed switch.
If the virtual distributed switch is associated with a network of a single usage, as displayed in the following figure, select the physical network port used for this network for the nodes to be added.
If the virtual distributed switch is associated with networks of multiple usages, as displayed in the following figure, select the physical network port shared by these networks for the nodes to be added.
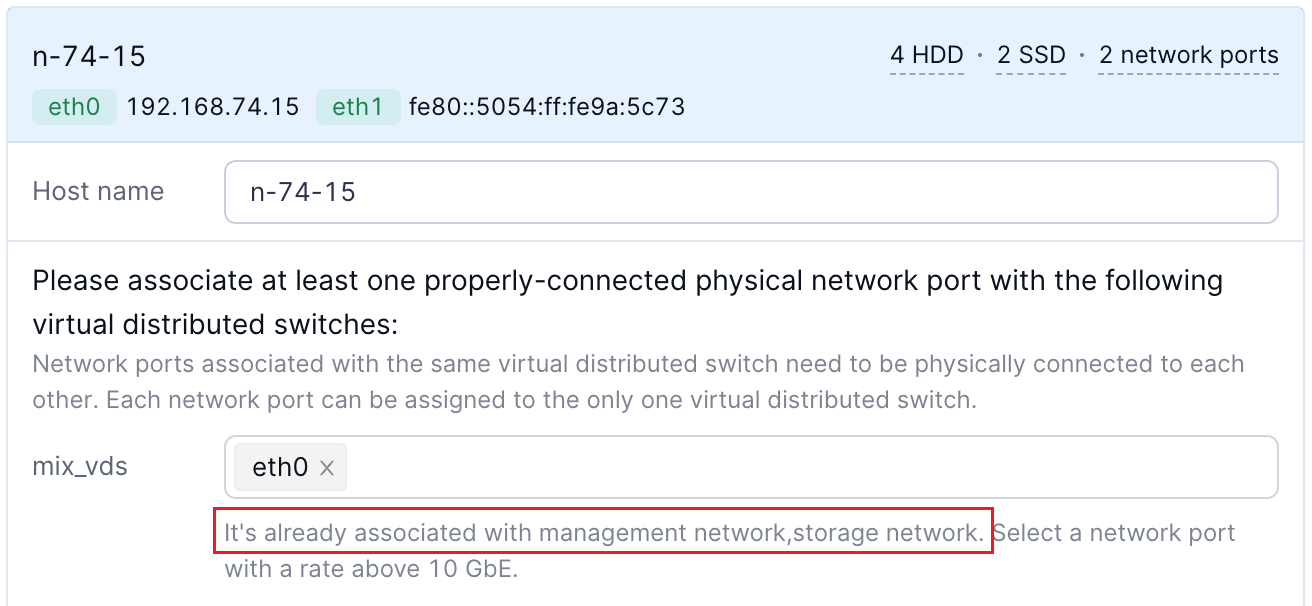
You can determine an appropriate port based on the displayed port speed, connection status, and MAC address. If the physical switch connected to these networks has LACP enabled, you need to select two network ports for port bonding.
Note
The MTU of the newly added port must be greater than or equal to the maximum MTU of all virtual networks (including system networks and VM networks) associated with this virtual distributed switch. If the newly added port does not meet the requirements, you need to select Increase MTU for all associated ports to this value. The system can automatically adjust the physical port.
Enter the planned management IP addresses and storage IP addresses for the nodes to be added.
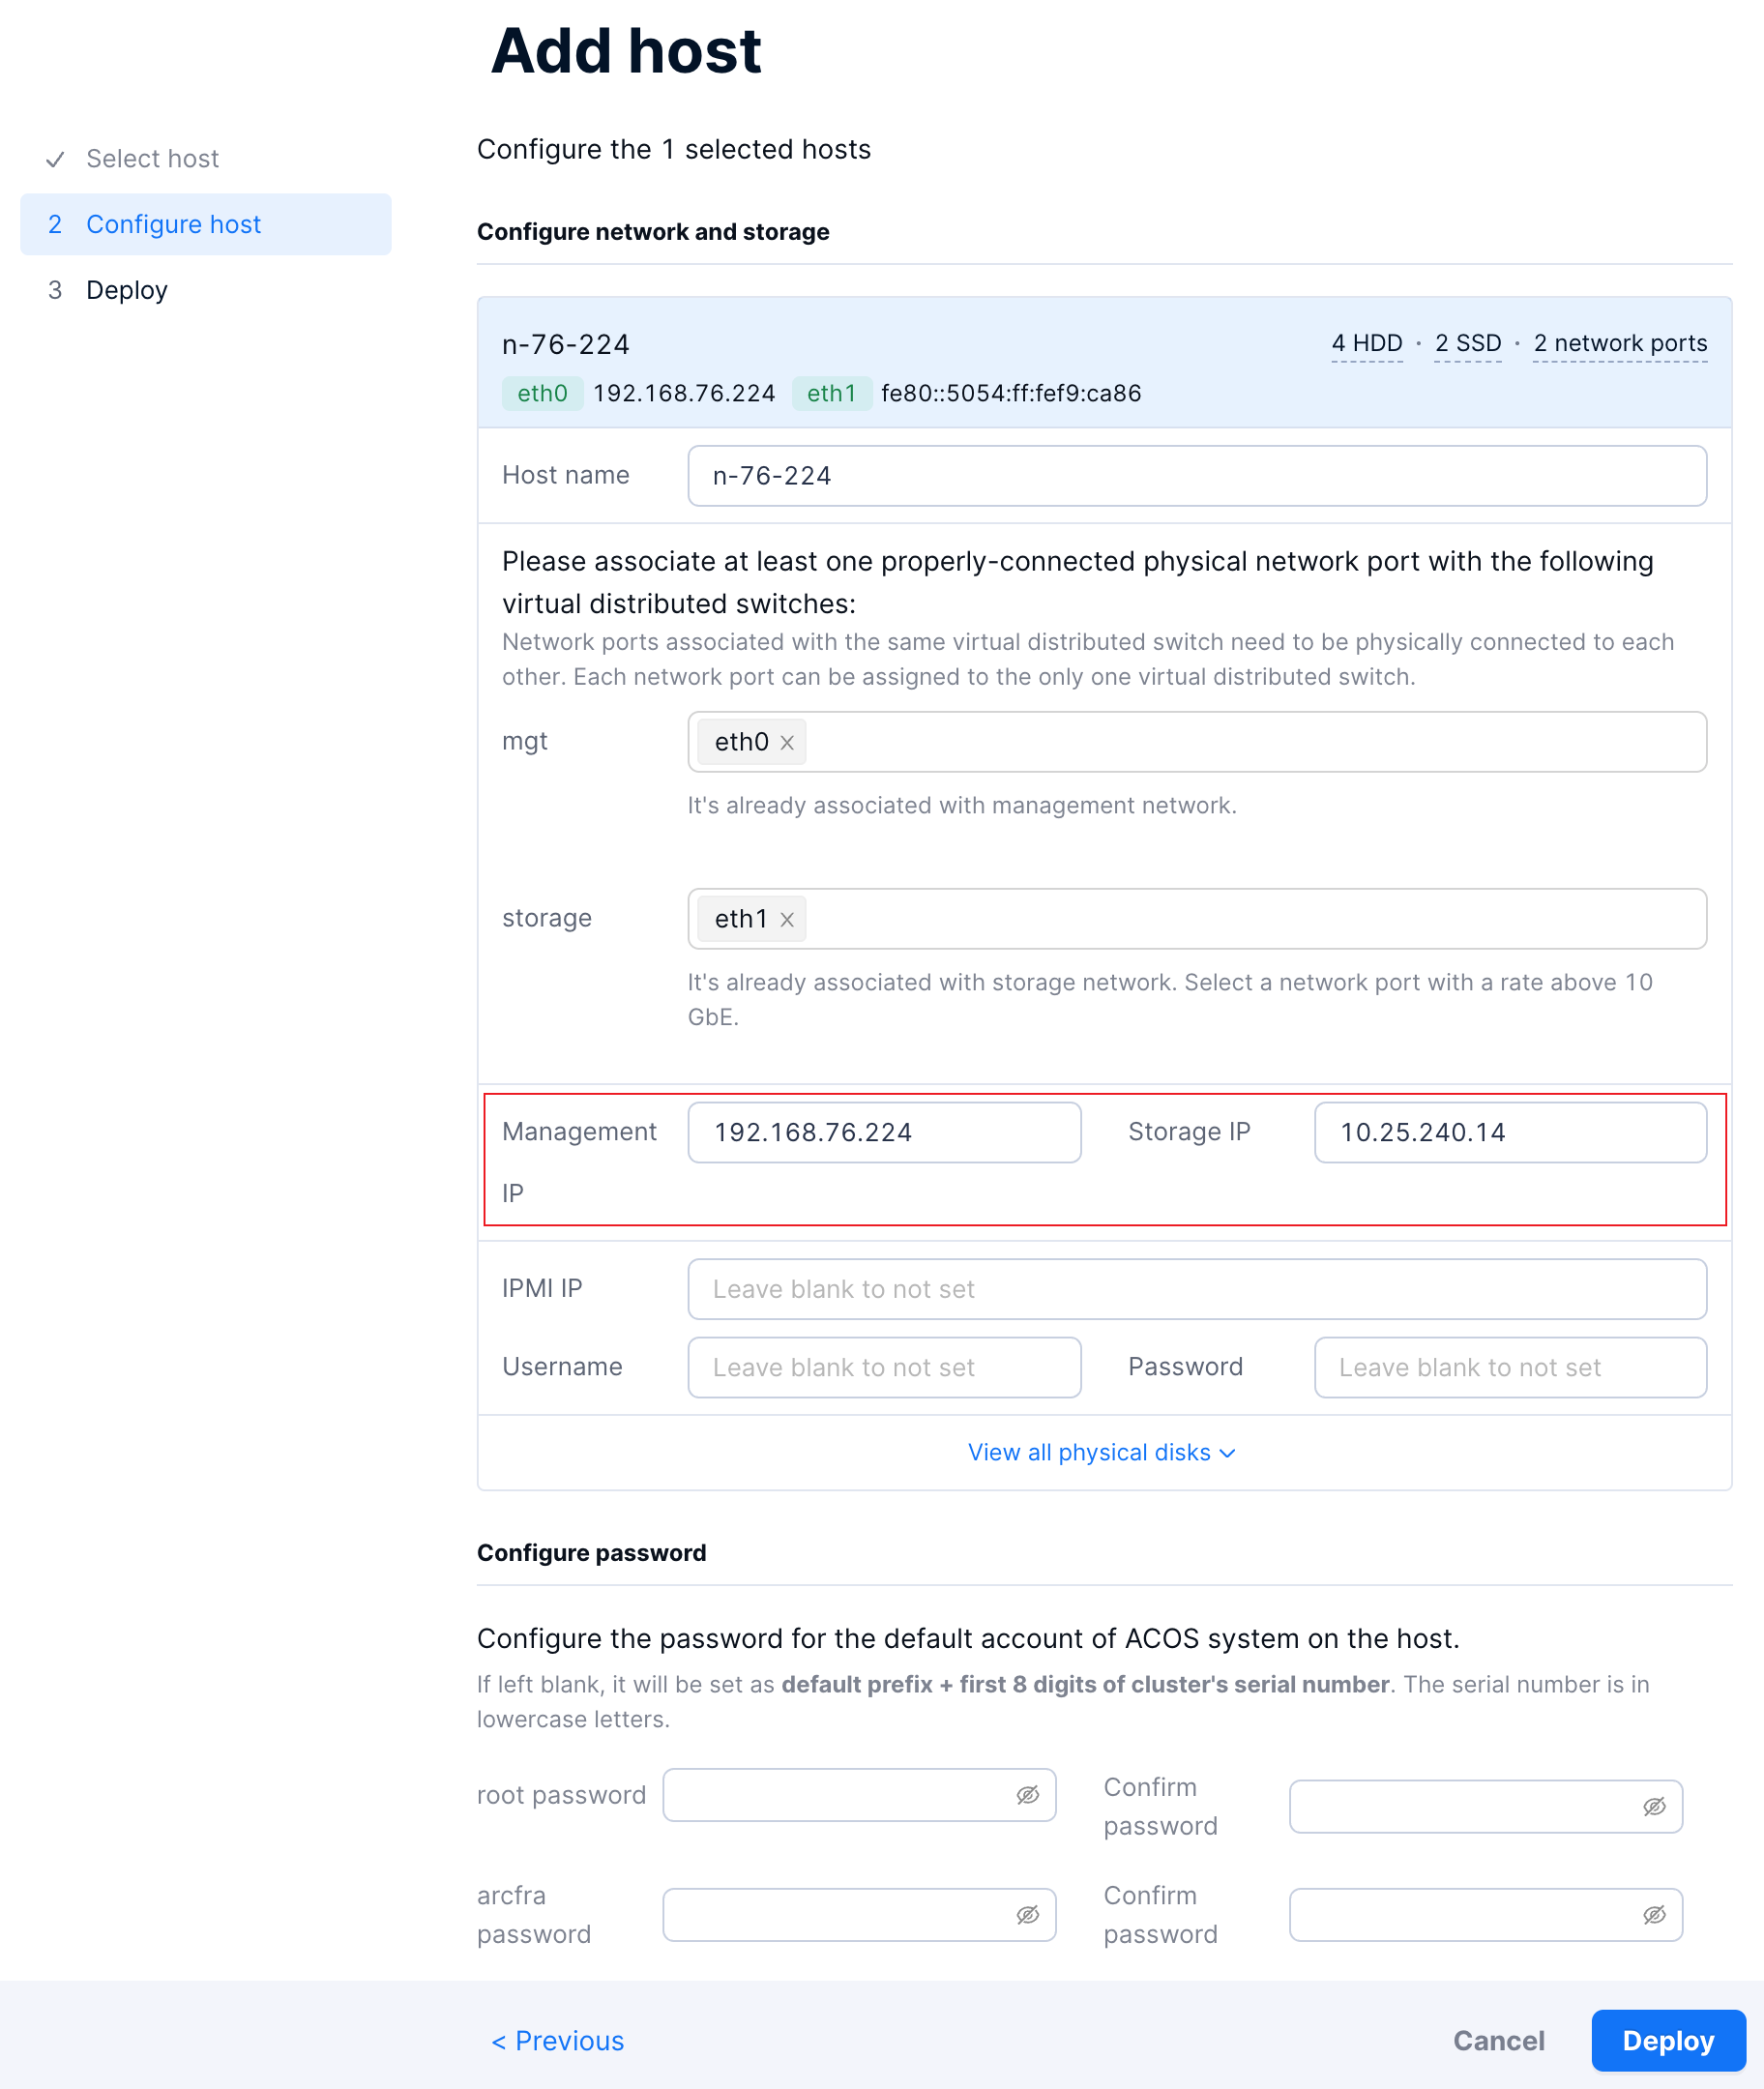
Optional: Enter the IPMI IP information, username, and password.
Optional: Specify the usages of physical disks. You can modify the usages of physical disks except for the Arcfra system disk, cache disks with metadata partitions, and data disks with metadata partitions.
If the nodes to be added are configured with hybrid flash or all-flash using multiple types of SSDs, you can manually change the usage to cache disk, data disk, or unassigned. Generally, you should change the usage of cache disks or data disks only when the system misidentifies their disk type.
If the nodes to be added are configured all-flash using a single type of SSDs, all physical disks other than the Arcfra system disk and data disks with metadata partitions are set to data disks by default. You can manually change the usage to unassigned as needed.
Uniformly set the password for the root account and arcfra account for the nodes to be added.
Click Deploy to start deploying the hosts.
Once the deployment begins, the page will display the overall deployment progress. If you exit the page, you can also view the deployment progress in the Task center. On the right of the task entry, click the ellipsis (...) > View details to return to the Deploy page.
If the deployment is successful, the Deploy page will indicate that the hosts have been successfully added.
If port access control is enabled in the cluster, the page will display a message indicating that all ports on new hosts are accessible from all IP addresses, that is, the new hosts do not automatically inherit any access restrictions defined in port access control. To configure access restrictions on SNMP and SSH services on the new hosts, click Configure access control, edit the storage network segment, and save the changes. Then configure the IP address allowlist for SNMP and SSH service ports of the new hosts. For details, refer to the Updating the port access control section.
If the deployment fails, the Deploy page will display a failure message. Follow the instructions as prompted for next steps.
If the page prompts that the cluster failed to connect to the new hosts, the failure is caused by incorrect network configurations. In this case, follow the steps below to add the hosts again:
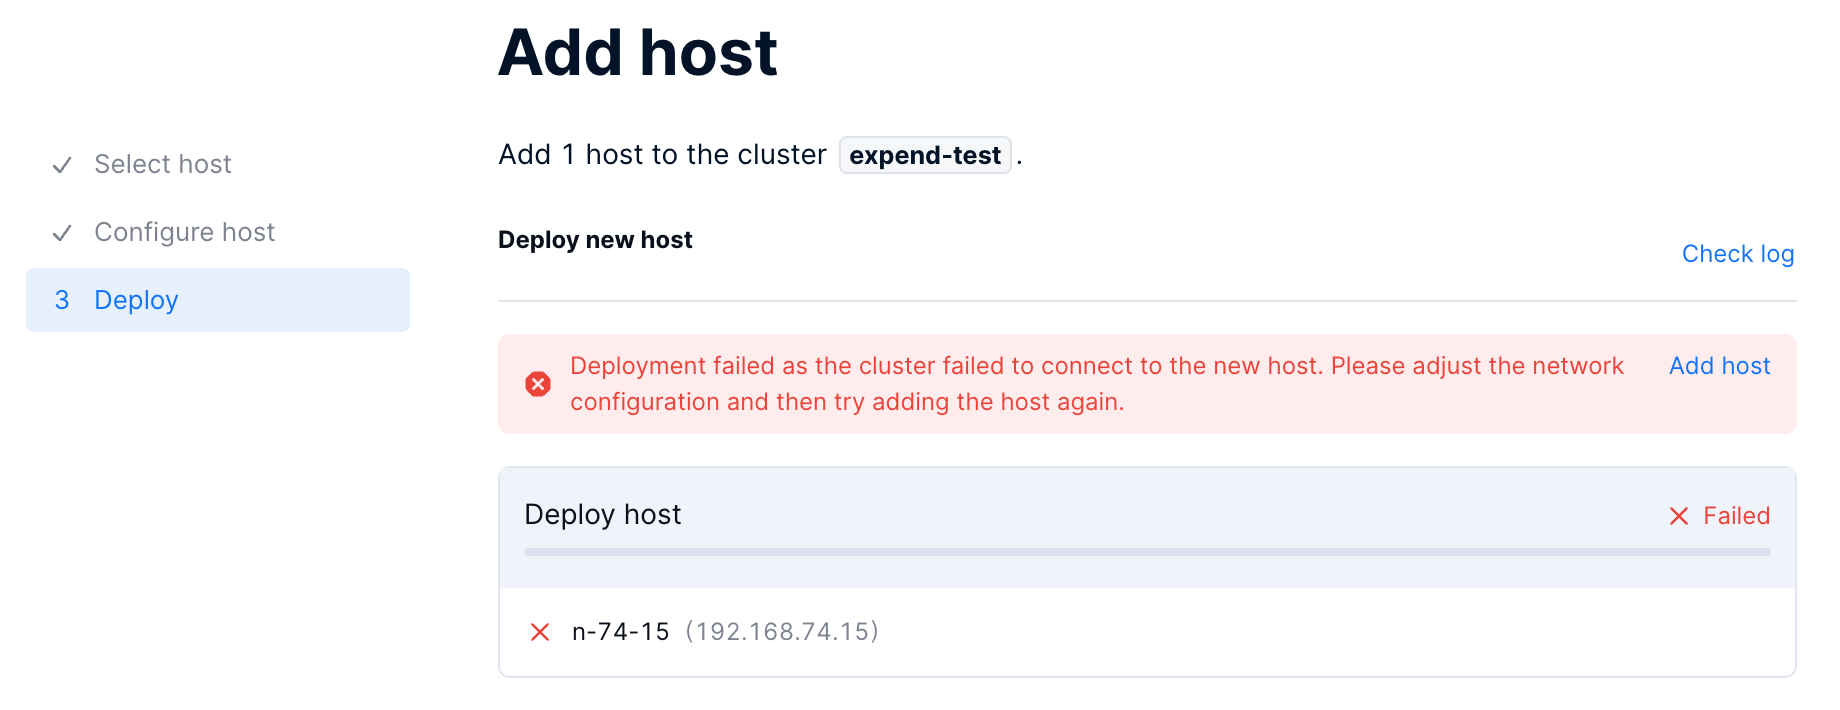
Access the hosts via the IPMI IP address and update the network configurations of the hosts.
Run the following commands on the nodes to be added to clear the host information and restart the deployment service.
zbs-deploy-manage clear_deploy_tag
systemctl restart zbs-deploy-server nginxOn the Deploy page, click Add host, and add the hosts again from step 1.
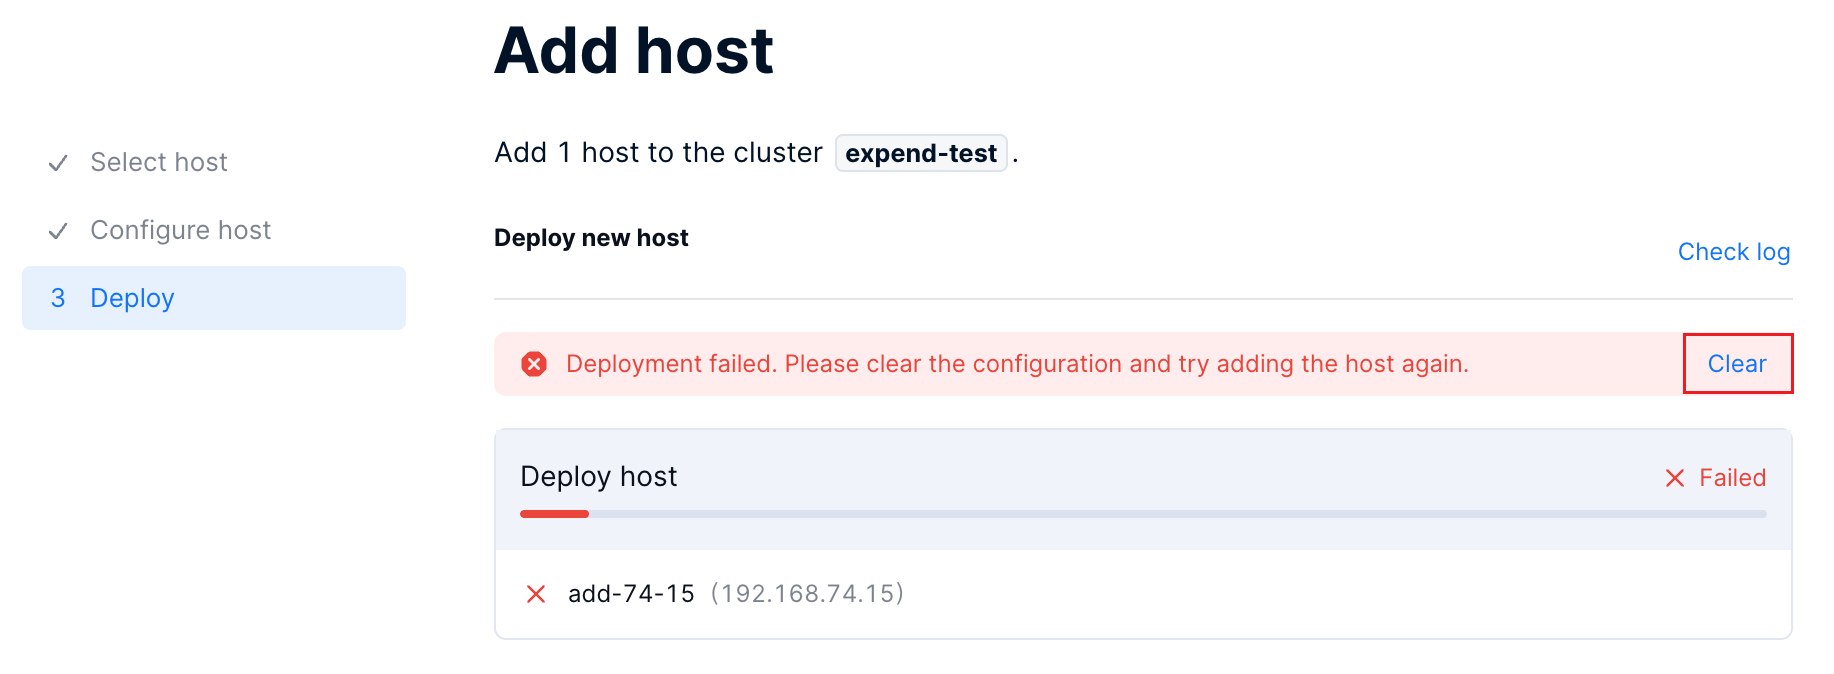
If the page prompts you to clear the configuration, it indicates that the network is configured correctly, but the deployment fails due to other configuration issues. Follow the steps below to add the hosts again.
Click Check log on the Deploy page to check the log details and troubleshoot the failure.
Click Clear on the Deploy page to remove residual data generated during the host addition process.
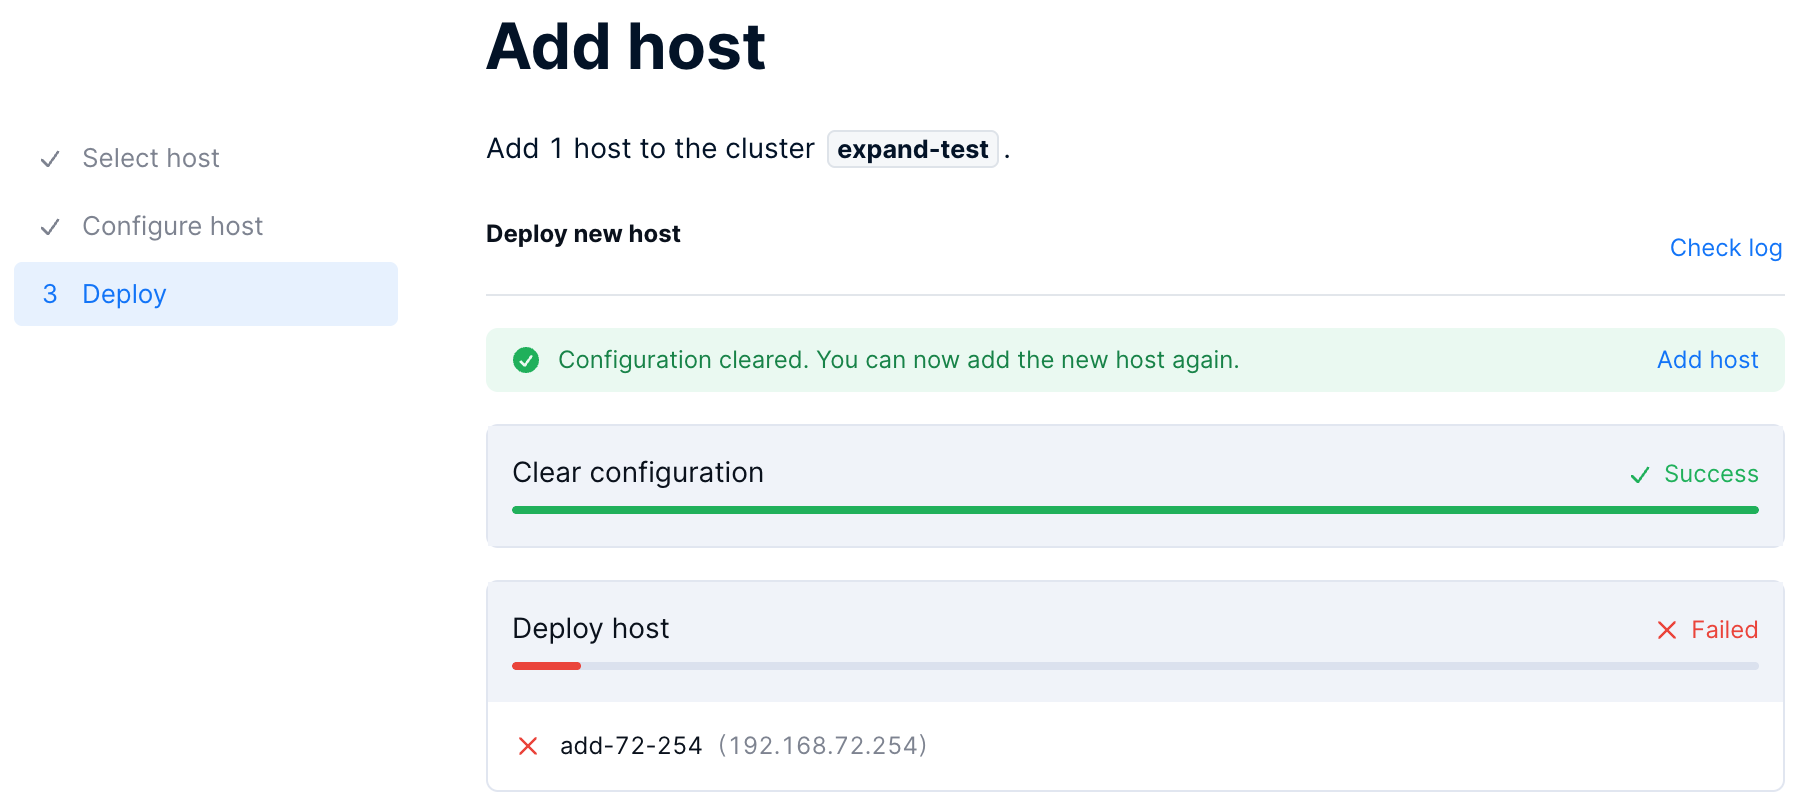
Once the clearing process starts, the page displays the progress. If you click Completed to exit the page, you can also view the clearing progress in the Task center. On the right of the task entry, click the ellipsis (...) > View details to return to the Deploy page.
Note:
If the clearing is not performed on time and this task involves hosts that have already been added or are being added to the cluster, do not clear the data.
After the clearing is complete, on the Deploy page, click Add host, and add the hosts again from step 1.
In AOC, verify that the nodes have been successfully added and the cluster operates properly.
Optional: If the total number of nodes in the cluster is greater than or equal to 5 but the number of master nodes is less than 5, convert some storage nodes into master nodes until the number of master nodes reaches 5. You can refer to the Converting the node role section for conversion.
Note:
Only one node in the cluster can be converted at a time. You cannot convert multiple nodes simultaneously.
Optional: If the cluster is associated with VPC networking, you need to add TEP IP addresses for the new hosts. For details, refer to the Editing an associated cluster.
Optional: If the cluster is configured with a separate business VM network, associate the new hosts with the virtual distributed switch to which this network belongs to ensure proper business operation. For details, refer to the Editing or deleting a virtual distributed switch.